Sunday 22 January 2012

Bargain hunting, Swooning and FMQ

It's been a pretty busy fortnight here on the home front.. Mum and I took the kids up to see my grandparents for a week so we spent our time beating the heat down at the beach! And really, it was HOT. The first 3 days were hot, humid and crazy and the water was a welcome relief.. then came the thunderstorm which finally brought in the sea breeze for the next 3 days.. until it got hot and horrible again the day before we left! But overall it was a lovely holiday. Of course while I was "away"  Spotlight decided to have a VIP sale where you got a $10 voucher to spend for each day of the sale  so mum and I made sure that we managed to fit in a few visits to make sure we got our money's worth ;) I managed to come out of it with some fabric that has been catching my eye for months..... at the bargain clearance price of $4/m!
Even better, when I got home I managed to find a couple of the other fabrics in the same range at my local Spotlight store so I think I ended up with about 9 different fabrics in the range overall. I also managed to pick up a June Tailor 12.5" square ruler & some of her plastic shape templates (star, heart, circle, flower, leaf) at 50% off, some Christmas quilting fabric & panels cheap on clearance and some other random fabrics that I'd had my eye on. Now I just need to find the perfect project for my pretty yellow/grey "Sunny" fabric!

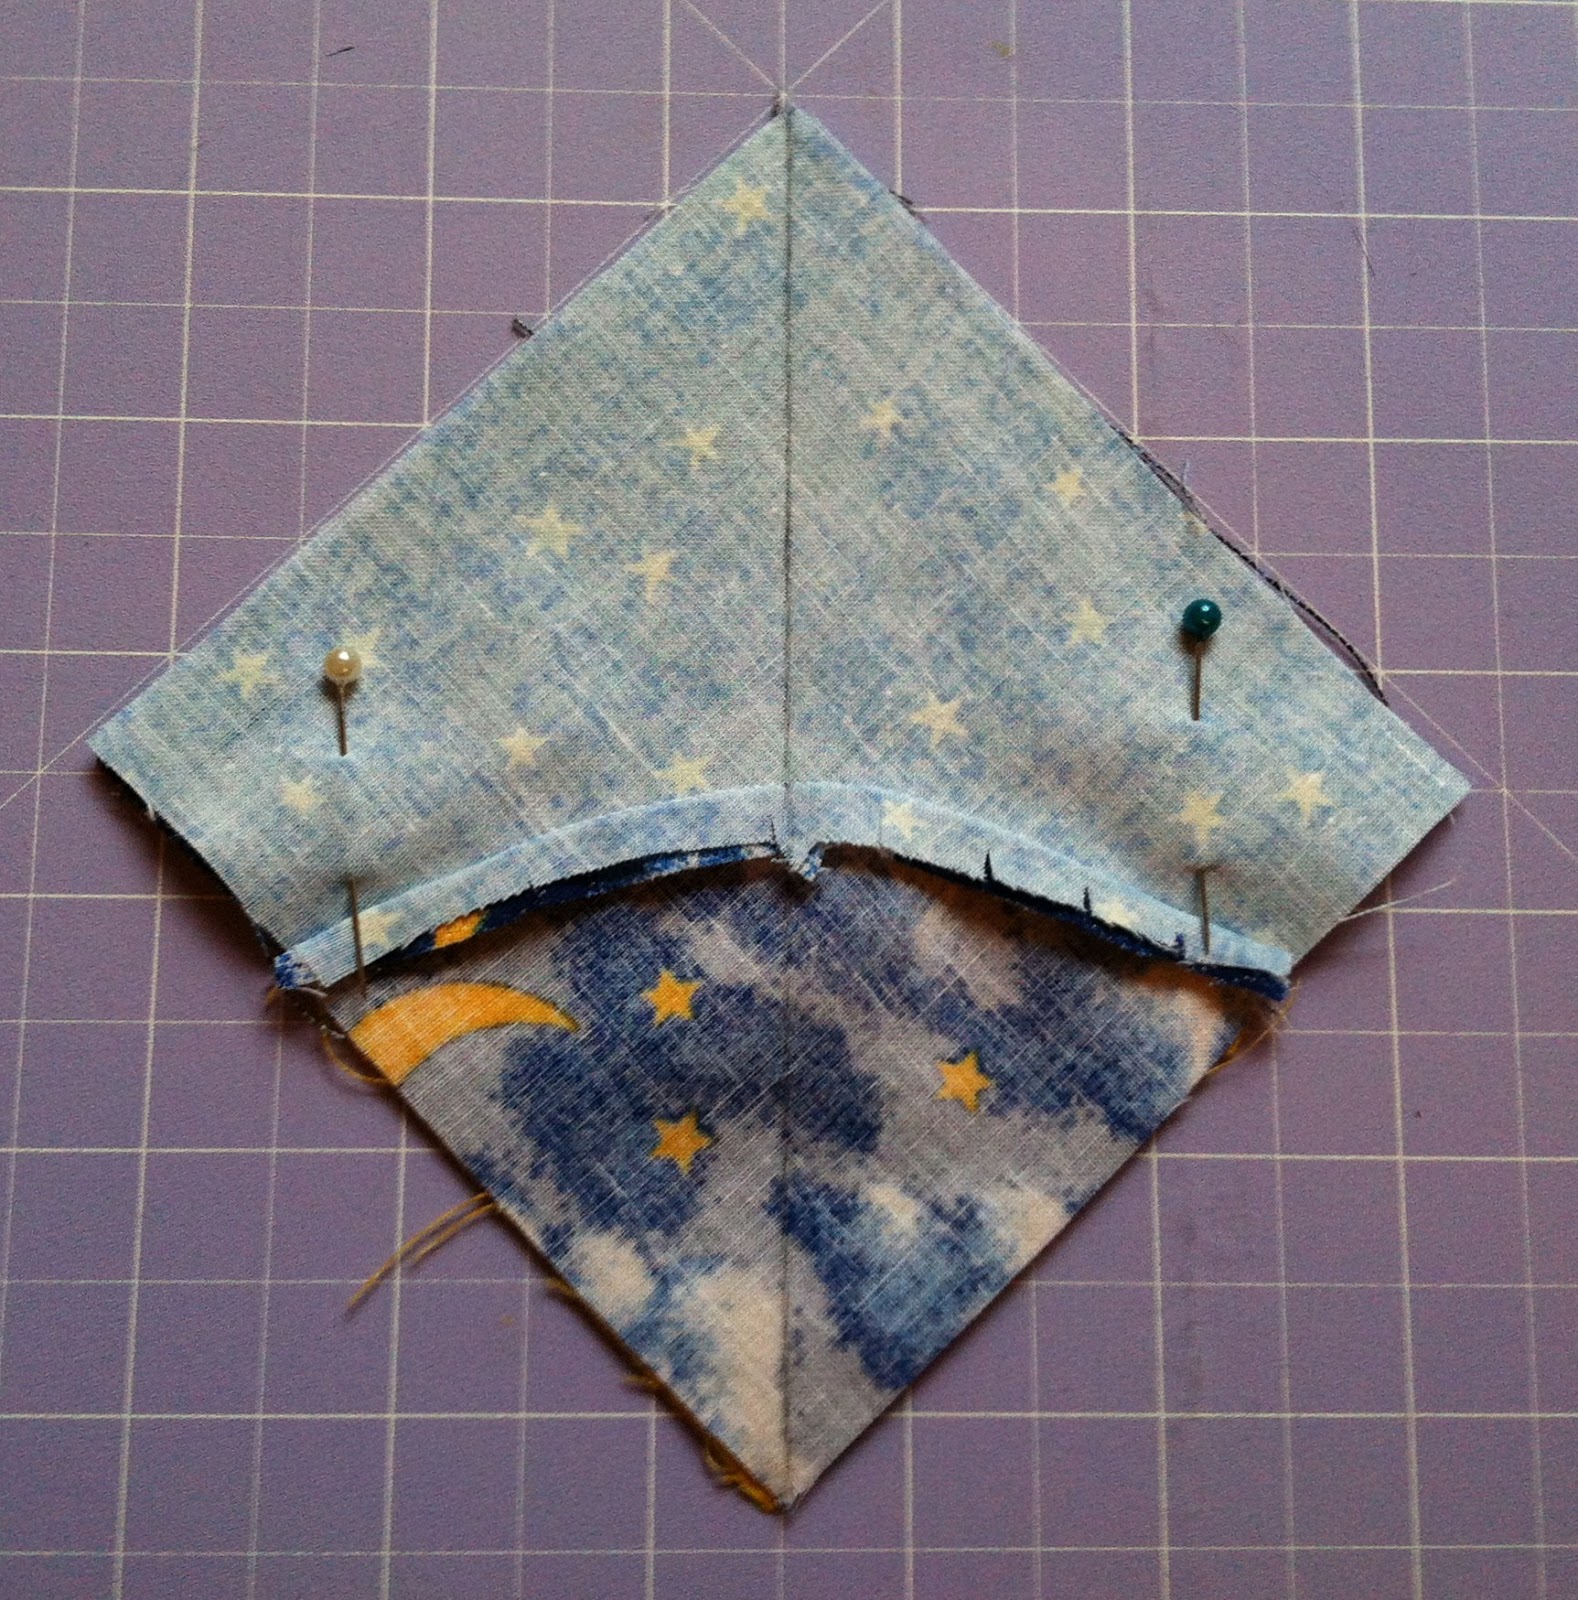
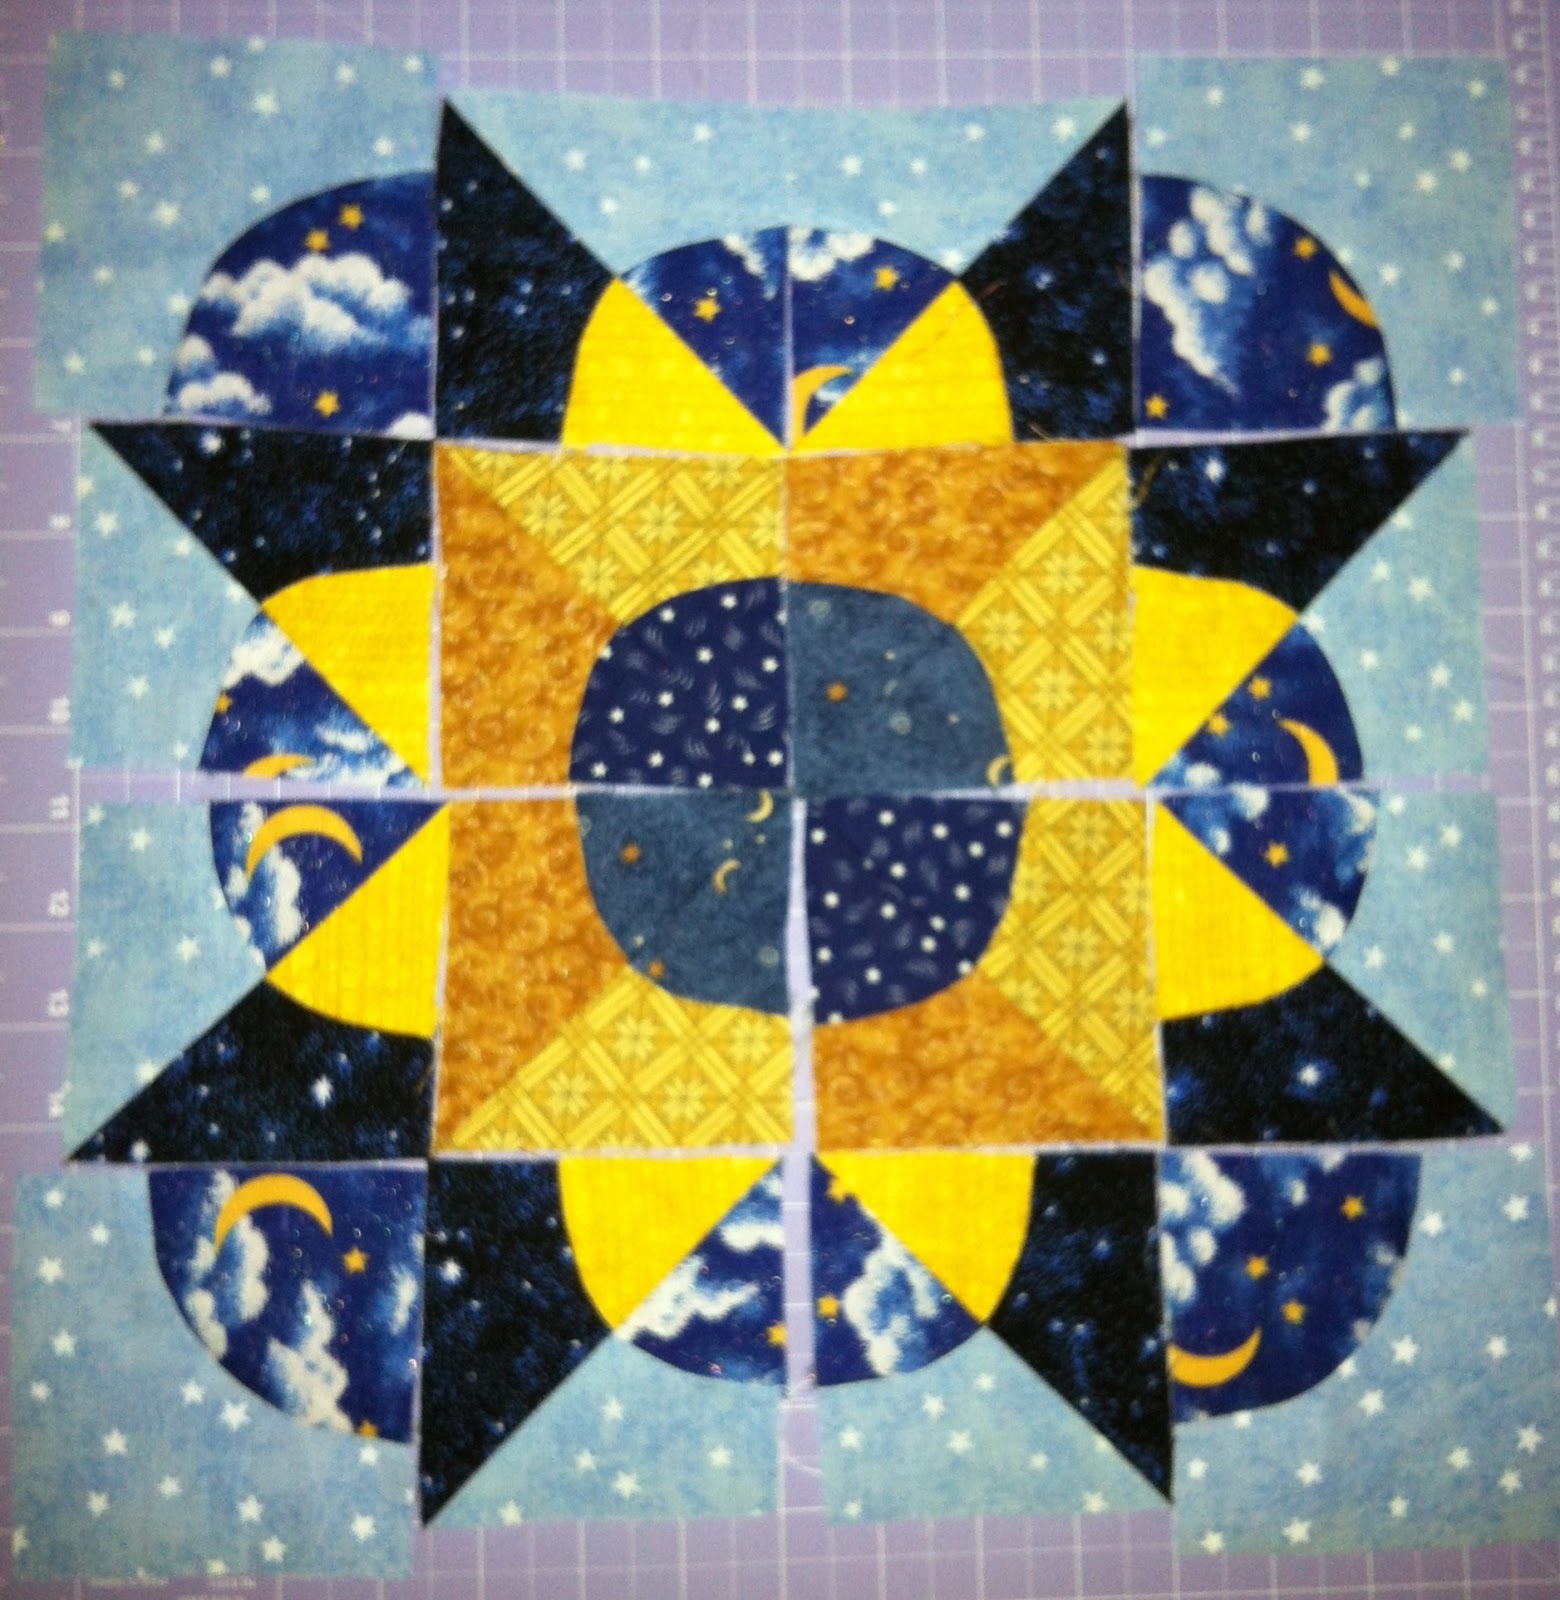
I've also joined in on Katy's Swoonalong, so at yesterday's craft morning playdate I cut pieces for my first block and today I completed it! These blocks will be for one side of the quilt that I've been planning to make as part of a marriage quilt for my husband and I. I purchased the fabrics back in October specifically for my quilt but with no real design idea in mind.. I had picked out a couple of star blocks that I'd been thinking over but once I saw that Swoon block it was just a case of deciding whether to use these fabrics or the fabrics I'd chosen for the other side of my quilt.

I've been working on my project for the Quilters with Modern Tools "GO! Ahead and Show a Little LOVE" AccuQuilt Blog Hop.. the blog hop will run from 13th - 18th February. The line up includes some of my favourite bloggers - I'm looking forward to seeing what everyone comes up with! And I hear rumors that there will be giveaways - yay!


Feb. 13 Marjorie from Marjorie Busby Quilts
Feb. 13 Ariane from Ariane's Crafts

Feb. 14 Connie from Quilting by the River
Feb. 14 Linda from Living 4 Quilting

Feb. 15 Lisa Marie from Scraps of Life
Feb. 15 Marilyn from North Hill Quilter

Feb. 16 Alicia from Heirloom Quilting
Feb. 16 Marjorie from Marjorie's Busy Corner

Feb. 17 Sharon from Craizee Corners
Feb. 17 Snoodles from Lily Pad Quilting

Feb. 18 Stacey from Driving Miss Stacey
Feb. 18 Tracey from The Peony Teacup (me!)
Feb. 18 Paulette from Sweet P Quilting and Creations

Do you want a sneak peek?


I decided to join Samelia's Mum's Name Game Swap at the last minute, so stay tuned for sneak peeks of the mini quilt I'll be making for my swap partner!


And last but not least, I finally got around to having a go at SewCalGal's 2012 FMQ challenge..  I read somewhere that felt made an excellent practice fabric, so I thought I'd give it a go before moving on to quilt sandwiches.. Here's my first attempt:
Front side
Back side
I boxed myself in a couple of times, and then my bobbin ran out and I decided that seemed like a good time to finish for the day. With a little more practice I think I  might even be able to turn out something that looks like leaves!

Thursday 12 January 2012

How excitement!

I got an email from Jess @ Scrap 'n Happy to say that I won her Scrappy n' Happy: Winners and Giveaway 3! competition! A $25 voucher to spend in Quiltjane's online store. The hardest part will be deciding what to buy from my long list of wants...

I'm thinking about a California Girls layer cake, but I wonder if I should get something I already have (like the American Banner Rose layer cake) so that I have some "spare" fabric for "just incase I need it" when I make MY quilt. But that seems so boring, you know? Who buys something they already have???

Tuesday 10 January 2012

2012 Quilty To do List..

Blossom starts Kindergarten this year (3 weeks to go!) so I'll have 2 days/week ALL TO MYSELF! For the first time in nearly 6 years I'll have 2 full school days to do whatever I want without someone whinging, needing to be fed/changed/entertained etc. So of course I'd mentally pencilled in a whole lot of craft time! And if I'm going to be crafty, perhaps some structure would be nice?

So in honour of my new found freedom, I appear to have signed myself up to a million and one projects (ok, more like half a dozen!), including:

1. Finish Bean's Harry Potter Quilt - Needs to be completed by May 1.

2. Make baby quilt for my sister-in-law - Needs to be completed by the beginning of April.

3. Learn how to FMQ - I took the pledge to join SewCalGal's 2012 FMQ Challenge

http://sewcalgal.blogspot.com/p/free-motion-quilt-challenge.html
4. Joining MALT Designs' Disappearing 9 Patch Swap - The theme is "Spring Floral" and each participant makes 18x 9-patch blocks to make a total of 72 smaller blocks, keeping 8 and sending the remaining 64 to Michele @ MALT Designs. I finished all my 9 patches today, and then sliced and diced them and now all I need to do is post them! Goodness that was quick and easy!


5. Participate in the Valentine's Day Accuquilt Blog Hop - more about this soon ;) I have all my fabrics picked out, I just need to get Flo the GO! cranking..

6. Joined the Craftsy BOM - 12 months of quilty goodness led by Amy from Stitchery Dickory Dock. Here are my 2 January Blocks (I'm using "Delighted" by The Quilted Fish for Riley Blake)
Wonky Pound Block

Asterisk Block
7. And tonight I've managed to also sign myself up to participate in I'm a Ginger Monkey's "Swoon-along" where we all make Swoon blocks from Camille Roskelley's Thimble Blossoms pattern. I plan to use my "Tulips in Bloom" fabric that I purchased to make a quilt for myself and my husband - what better to snuggle under than something swoony?

http://www.flickr.com/groups/1904864@N22/
8. Make "Good Fortune" (Kate Spain for Moda fabrics) mug rugs for my girlfriends.. I make some D9P blocks out of my GF charm pack today..

Not to mention the other things that are floating much further down my "To Do" list!

It certainly looks like it will be a quilty year..

Wednesday 4 January 2012

Tutorial: Split Drunkard's Path Star

A while ago I mentioned that I was going to write up a tutorial for the Split Drunkard's Path star block, but I must confess that Christmas and the end of the school year distracted me.. but now all that's over, it's a new year and the perfect time to get back on the wagon!

Split Drunkard's Path block
Step 1. Choose up to 8 coordinating fabrics - 2 for the "background" and 6 for the star. I cut my Drunkard's Path blocks using my Accuquilt GO! cutter and my 3.5" Drunkard's Path die. If you were using this block on its own for a quilt it would look amazing done with the 7" DP die. You will have left over DP pieces which you can use for other stars, or put aside for another project.

Step 2. Cut a total of 16 DP blocks, consisting of:

- 8 x "Background Fabric #1" (Outer curve pieces)
- 8 x "Background Fabric #2" (Inner curve piece)
- 4 x "Star Point Fabric #1" (Outer curve pieces)
- 4 x "Star Point Fabric #2" (Inner curve pieces)
- 2 x "Star Centre Fabric #1" (Outer curve pieces)
- 2 x "Star Centre Fabric #2" (Outer curve pieces)
- 2 x "Star Centre Fabric #3" (Inner curve pieces)
- 2 x "Star Centre Fabric #4" (Inner curve pieces)

Step 3: Pair the DP block pieces, alternating the "Star Centre Fabrics" (eg #1 + #3, #1 + #4, #2 + #3 and #2 + #4). Sew using your preferred piecing method. I pinned the blocks for the first 2 stars, and am now using a Curvemaster foot to piece the blocks for subsequent blocks.. seriously, much more consistent on the seams, with no pinning!

Step 4: Pair up 4 of the "Background" blocks with 4 of the "Star Point" blocks, and the 4 "Star Centre" blocks, matching the inner pieces. 

Step 5: Pin and mark a line diagonally through the centre of the block.

Step 6: Sew 1/4" on either side of the line. (as shown above with grey stitching + white stitching)

Step 7: Using rotary cutter cut along the pencilled line so that you have 2x blocks. Press open.

Step 8: Lay out your blocks to form a star shape. The 4x corner "Background" blocks will be larger than the other blocks as they haven't been cut up, but don't panic.. we'll trim them up!

Step 9: Sew the pairs of "Star Points" and the "Star Centres" together, making sure to match the curves. Attach one set of "Star Points" at the top and the bottom of the "Star Centres" to make a column. Press seams.

Step 10: Trim your 4 "Background" blocks to match your other blocks. I trimmed the outer curve pieces and left the inner curves at full size, but you could trim it evenly all the way around if you prefer.

Step 11: Sew the "Background" blocks to the remaining "Star Point" blocks so that you end up with 3 "columns" of blocks (as shown above). Press seams and then sew columns together making sure to match seams. Press again, and you're done! (Square up blocks as required)

My first Split Drunkard's Path Star complete!

And a second one so you can see it in a different colour
Effective, yes?
Related Posts Plugin for WordPress, Blogger...

ShareThis

Online Quilting Class